Interior Design Selections: A Room-by-Room Checklist and How to Present Them
By Gus Maldonado, Founder of Board Composer ·
A single room can need a dozen or more decisions: the sofa, the rug, the lamps, the paint, the hardware on the doors. A whole house runs well past a hundred. Choosing the products is only half the work. The other half is keeping track of all of them and getting the client to decide.
On the projects I worked on, selections were built in PowerPoint to make a PDF, and tables were also made inside the CAD drawings. What I saw happen was that the client didn’t decide on the finishes. Time went by, there were so many finishes that one was forgotten, and some finish was still undefined. That caused problems at the end, because the client had not decided, and sometimes measurements were taken wrong.
This guide has three parts: a checklist so nothing is forgotten, what a selection sheet should include, and how to present selections so your client answers product by product.
What counts as a selection
A selection is any product or finish the client has to approve before it is ordered. That includes the furniture everyone pictures, and also the details that are easy to forget until the contractor asks: grout color, cabinet pulls, the finish of the faucet.
Selections fall into two groups. Furniture and decor: sofas, tables, lighting, rugs, window treatments, art and accessories. Finishes and fixtures built into the space: tile, flooring, countertops, cabinetry, plumbing fixtures, hardware and paint. Both need the client’s decision, and both end up in the FF&E schedule the contractor works from.
A room-by-room selections checklist
A checklist helps make sure no finish is left undefined. Use it as a starting point and remove what doesn’t apply to the project.
- —Kitchen: cabinetry, countertops, backsplash, sink, faucet, cabinet hardware, appliances, pendant and under-cabinet lighting, bar stools, paint.
- —Bathrooms: vanity, countertop, sink, faucet, shower and tub fixtures, toilet, floor and wall tile, grout color, mirror, sconces, towel bars and accessories.
- —Living room: sofa, lounge chairs, coffee and side tables, rug, floor and table lamps, window treatments, art, paint.
- —Dining room: table, chairs, chandelier, sideboard, rug, window treatments.
- —Bedrooms: bed, nightstands, dresser, bedside lighting, rug, window treatments, bedding.
- —Throughout the house: flooring, interior doors, door hardware, light switches and plates, paint and trim colors.
What a selection sheet should include
A selection sheet is the list of everything chosen for the project, grouped by room. The client approves from it, and later the same information becomes the schedule the contractor builds from. For each product, include:
- —A photo. Clients decide by the image first.
- —An item code, such as L-1 for the first lighting item, so everyone can refer to it without describing it.
- —Product name, vendor and model number.
- —Finish and color, written the way the vendor names them.
- —Dimensions and quantity.
- —Price, when the client is also approving the budget.
- —Status: approved, rejected or pending.
The free FF&E schedule template has these columns, a section per room and totals that add up by themselves. It works as a selection sheet too.
How to present selections so the client decides
- 1One room at a time. A presentation of the whole house invites general comments. One room invites decisions.
- 2Show the space in 3D. My advice is to always do it. Not every client can picture the products, and a 3D view helps them understand the space.
- 3Guide the client instead of opening every option. Show the options a product actually comes in, but don’t turn every item into a menu. When a client sees too many options, the picture opens up: they become more indecisive and start making their own combinations, instead of following the design you are leading them through.
- 4Put the price next to each product, so the client approves the design and the budget at the same time.
- 5Ask for an answer on every product: approved, rejected or still deciding. "Love it" is not an approval. More on this in How to get client approvals on interior design selections.
- 6Give a date. "Please answer by Friday so the order goes in on time" turns a presentation into a decision.
- 7Review what is still pending at every meeting. A finish left pending for weeks is the one that gets forgotten.
- 8Number every round, so you always know which version the client answered. See How to keep a record of every design revision.
How Board Composer handles it
In Board Composer, selections are organized by room from the start, and the same products become the presentation, the client’s approvals and the contractor’s schedule.
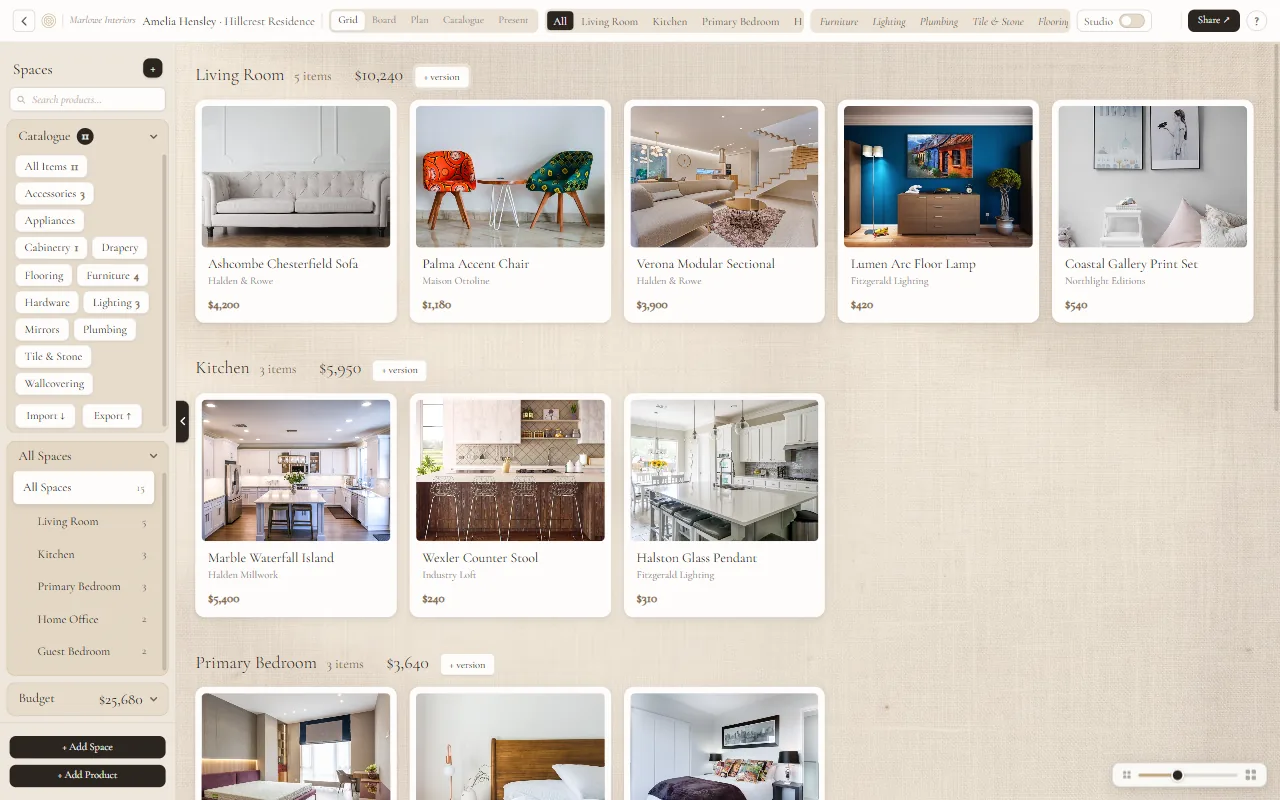
Room by room, with every detail. Each product has its photo, item code, vendor, supplier, model number, finish, dimensions, quantity and price. Filter by room with the tabs, or by category: Furniture, Lighting, Plumbing, Tile & Stone, Flooring, Cabinetry, Hardware, Appliances and more, or your own.
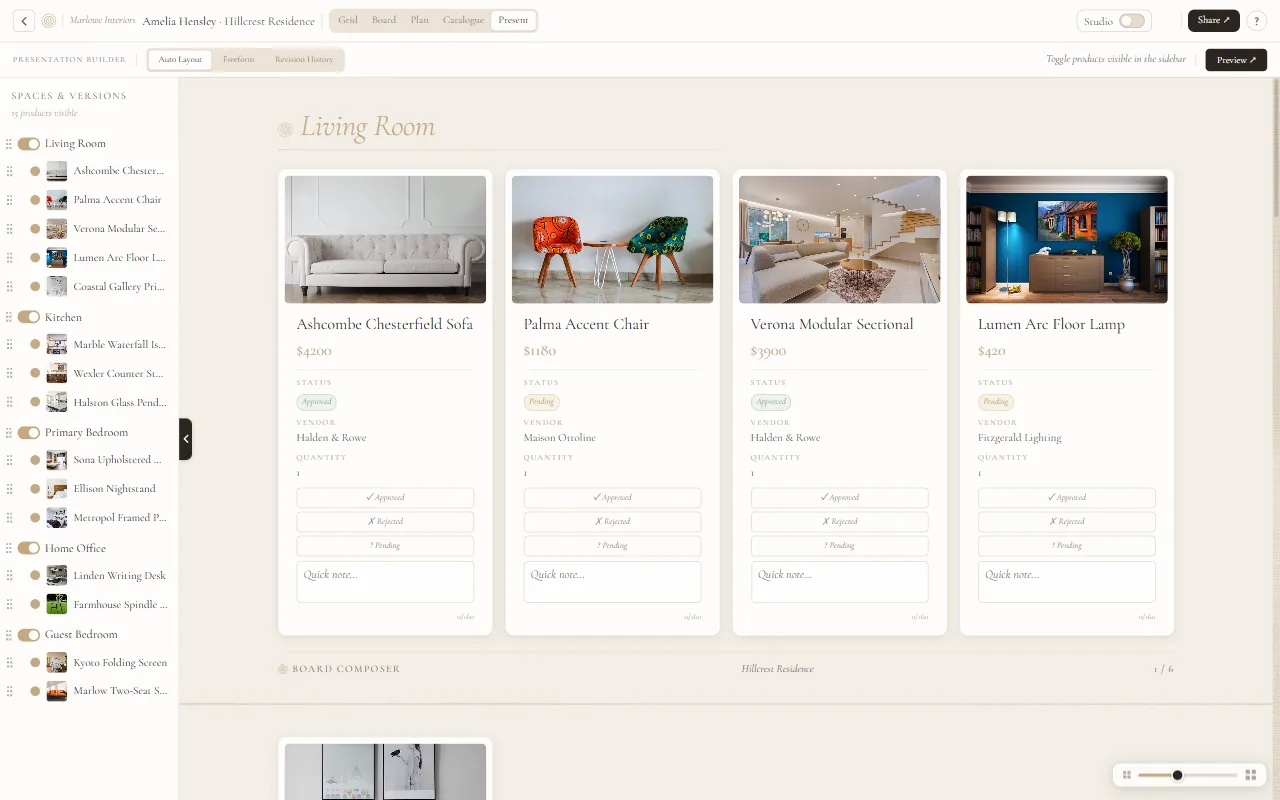
Nothing left undefined. Every product has a status: approved, rejected or pending. Once the client reviews a shared link, each card shows a colored border, green for approved, amber for pending or commented and red for rejected, so what is still open stands out.
Option A and Option B. Click "+ version" next to a room to build an alternative selection for it. The budget counts the version you are working on, so the total is never doubled.
The budget adds up as you go, per room and for the whole project.
A product library. Save a product to the Catalogue once and add it to any project later.
Present and collect answers. Present shows your selections room by room. Share it as a link and the client approves or rejects each product, with a note if they want, from any phone, tablet or computer. Or export it as a PDF.
Sharing links and choosing which details the client sees are part of the Pro plan. On the Free plan you can organize the selections of one project and export a PDF.
Frequently asked questions
What is an interior design selection sheet?
A list of every product and finish chosen for a project, grouped by room, with a photo, vendor, finish, dimensions, price and status for each item. The client approves from it.
What is the difference between a selection sheet and an FF&E schedule?
The selection sheet is for the client to decide. The FF&E schedule is for the contractor to order and install, with the technical details. They share most of the same information, so it helps to keep both in one place.
How many options should I show a client?
The options the product actually comes in, and no more. Too many options make a client more indecisive. Your job is to guide them through the design.
Can my client approve selections from their phone?
Yes. The shared link opens in any browser, on a phone, tablet or computer, with no account.
Organize your next project’s selections room by room.
Start free↗