Getting started
Board Composer is a browser-based workspace for interior designers. No installation required — open a tab, create an account, and your first project is ready in under a minute.
Organize your products
Grid View organises all your products in a structured, room-by-room layout. Every item carries specs, pricing, and supplier info — all in one place, always in sync.
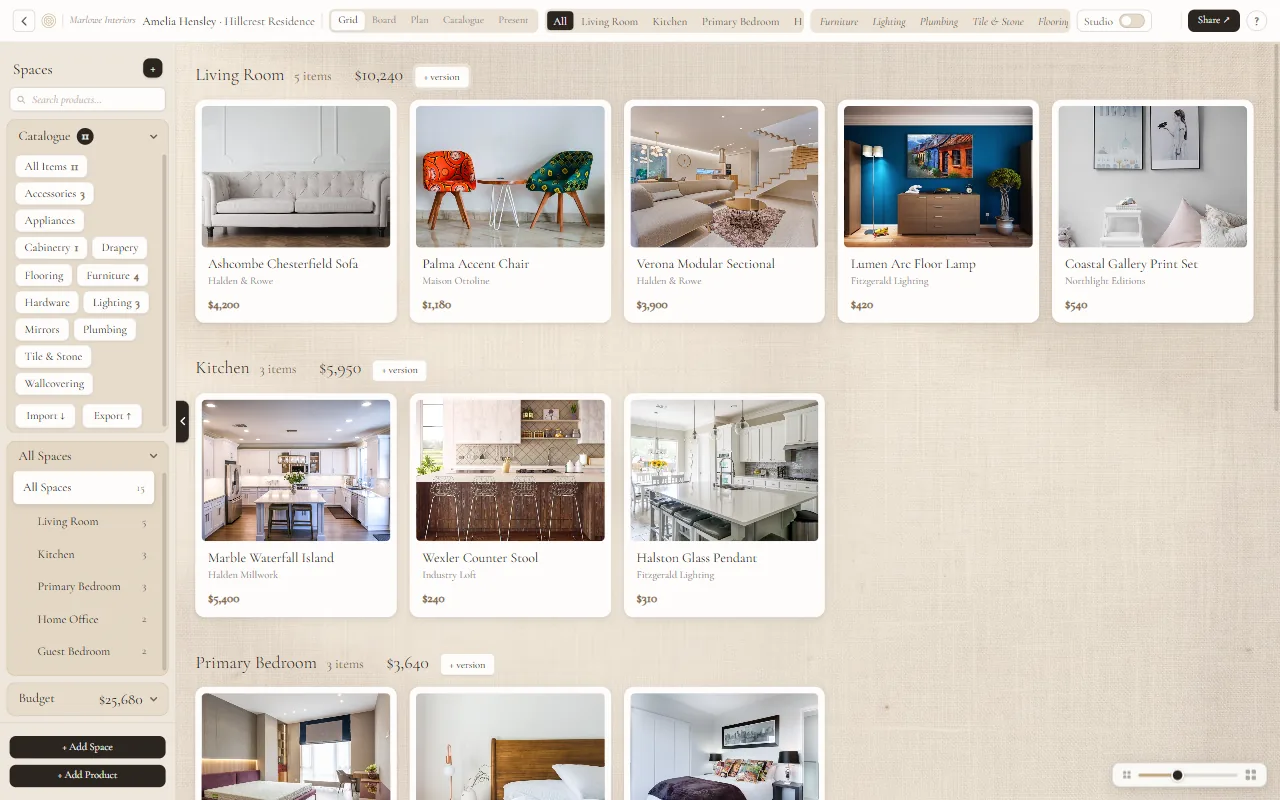
Click "+ Add Space" at the bottom of the left sidebar. Type the room name — Living Room, Kitchen, Master Bedroom — and press Enter. Repeat for each room in the project.
Click "+ Add Product" at the bottom of the left sidebar. Upload an image from your computer, paste one straight from your clipboard, drop it onto the card, or drag a saved item from the Catalogue panel on the left.
Click any product card to open its detail panel. Add supplier, dimensions, finish, price, model number, and notes, then click "Save Changes".
Click a card to open its detail panel and choose Approved, Rejected, or Pending under Status. Use it to track decisions without removing any product. In Studio mode, once your client reviews a shared link, each card also shows a colored border — green approved, amber comment or question, red rejected — so you can see where everything stands at a glance.
Click "+ version" next to any room name. This creates a parallel selection for that room — for example, "Option A" and "Option B" with different products. Show your client both versions and let them choose.
Open the product's detail panel and change the room from the dropdown. The product moves instantly without losing any of its specs or images.
The Budget panel at the bottom of the left sidebar shows a running total per room and for the whole project, updated automatically as you add or remove products.
* The Studio / Client toggle and the ⚙ Client View Settings live at the top right. Flip to Client to preview exactly what your client sees and to reveal the ⚙ icon. The toggle is not available in Plan or Catalogue view.
Design your canvas
Board View is an open canvas where you arrange products exactly as you'd present them to a client. Pan, zoom, group by space, and switch to presentation mode with one click.
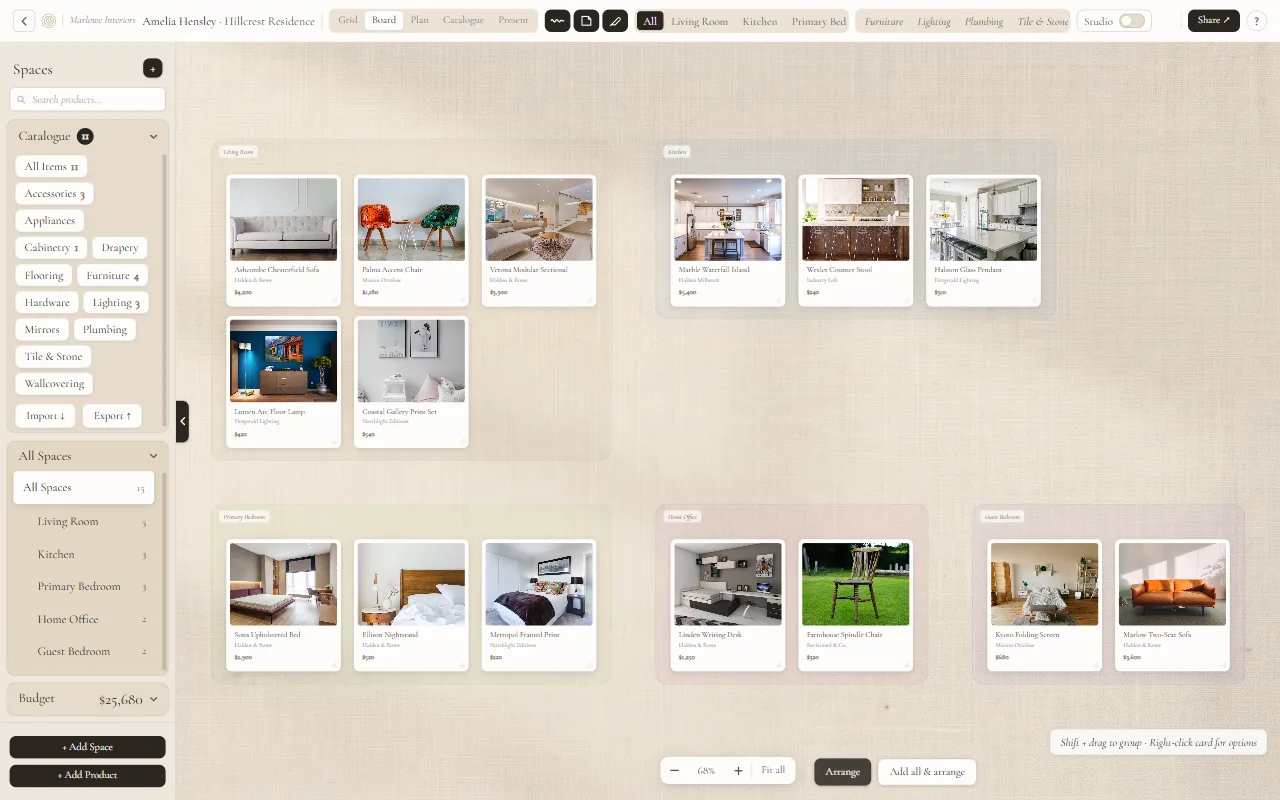
Scroll to zoom in and out. Click and drag on empty space to pan. Use "Fit all" at the bottom toolbar to reset the view and see all products at once.
Hold Shift and drag across multiple product cards to select them. A labelled transparent overlay marks the group. Drag the whole group to reposition it anywhere on the canvas.
Click the sticky note icon (second icon in the top toolbar). A note appears on the canvas — click it and type directly. Use it for client instructions, mood notes, or reminders.
Click the pencil icon (third icon in the toolbar) to activate freehand mode. A color palette appears — pick a color and draw annotations, arrows, or highlights on the board.
"Add all & arrange" drops every product onto the board grouped into a labeled frame per space. "Arrange" tidies what is already placed. Drag a space frame to move the whole cluster at once.
Place products on the plan
Upload a floor plan and position your room markers on it. Each marker shows the room name and product count. Tap to enter that room's board directly from the plan.
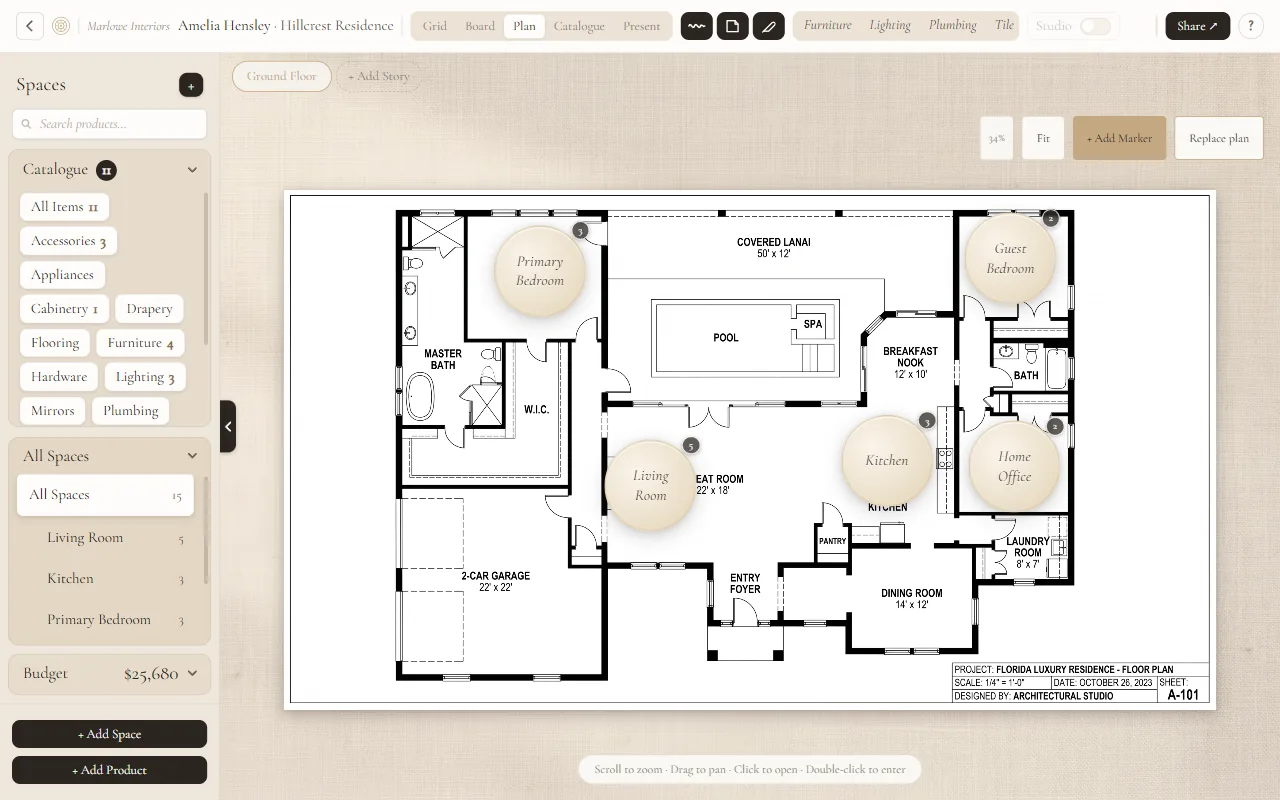
Click "Replace plan" in the top right of the Plan tab. Select your file — PDF, JPEG, PNG, or WebP up to 20MB. The plan renders on the canvas immediately.
Drag any space from the left sidebar onto its spot on the floor plan, or click "+ Add Marker" and pick a space that is not on the plan yet. A labeled marker appears showing the space name and its product count. Repeat for each space.
Drag each marker to its exact location on the floor plan. Click a marker once to preview the room's products. Double-click to enter the room's board directly.
Click "+ Add Story" next to the "Floor 1" tab at the top. Each floor has its own plan and its own set of room markers. Switch between floors using the tabs.
Click the pencil icon in the toolbar and pick a color. Draw notes, arrows, or highlights directly on the floor plan. Annotations are saved with the plan.
Present your work
The Present tab turns your board into a client-ready presentation. Choose how your products appear, preview before sending, save revisions, and collect client feedback — all from one place.
Structured presentation grid
Auto Layout organises your products into a clean, room-by-room grid automatically. No manual positioning — the layout is generated from your Grid View data and updates whenever you add or remove products.
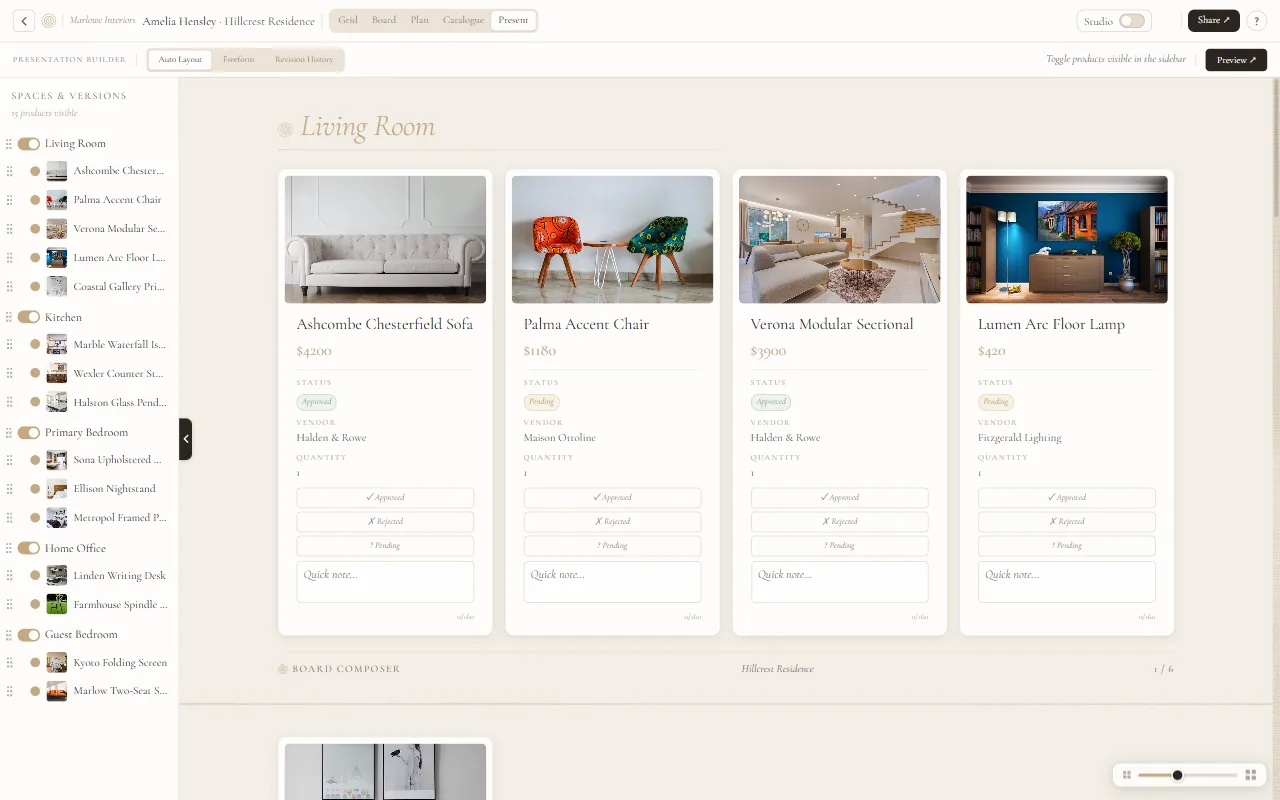
Click "Present" in the top navigation bar of your project. The Present tab opens showing your products in the current layout mode.
At the top of the Present panel, click the "Auto Layout" toggle. The layout generates automatically — products appear grouped by room in a clean structured grid.
Scroll through the presentation. Each room appears as a labeled block with the room name, product count, and subtotal budget. Confirm all rooms and products appear correctly.
The left sidebar lists all your spaces and their products. Click any product row to toggle it on or off — a filled gold dot means visible, an empty dot means hidden. For space versions (Option A, Option B), use the pill switch to show or hide the entire version at once. Hidden items disappear from Auto Layout immediately but remain in the project.
Drag spaces and products in the left sidebar to reorder them, or use the ‹ › arrows on each card. The order stays in sync with Grid View and the Technical Schedule, so a change in one updates the others.
Click "Preview" in the top right to open the client view in a new tab. Confirm the layout, product images, and room sections look correct before sending the share link.
Present your canvas as designed
Freeform shows your presentation exactly as you arranged it in Board View — card positions, groupings, sticky notes, and freehand drawings all preserved. Use it when the visual composition is part of the design story.
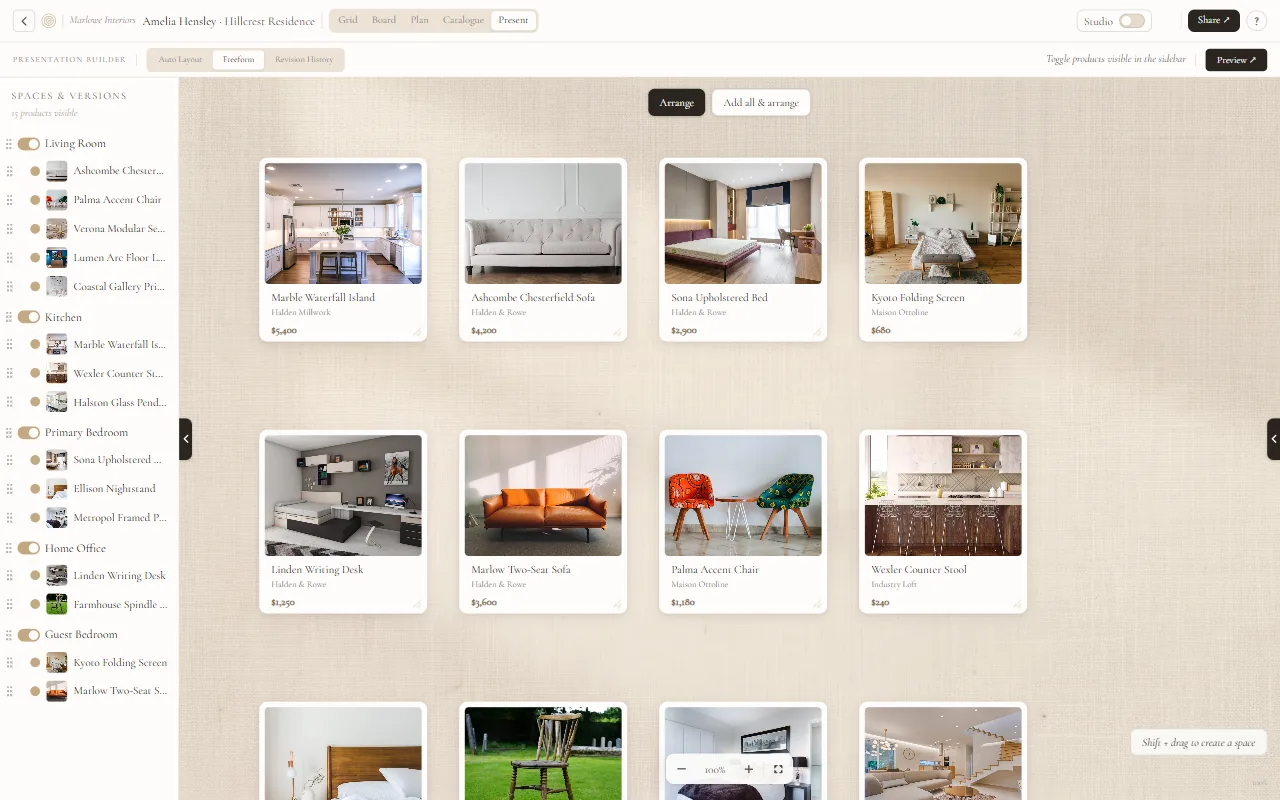
Before switching to Present, go to Board View and finalize your arrangement. Freeform mirrors the canvas exactly — card positions, groupings, sticky notes, and drawings all carry over.
In Board View, make sure all products and annotations are within the visible canvas frame. In Freeform, any content outside the frame edge is clipped and will not appear in the presentation.
Click "Present" in the top navigation, then toggle to "Freeform" in the mode selector. Your canvas composition appears exactly as arranged in Board View.
Hold Shift and drag on the canvas to draw a group area — the cursor changes to a crosshair. Release when the area covers the products you want to group. The group label appears over the selection. You can reposition, resize, or delete groups without affecting the Board View.
Freehand drawings and sticky notes placed in Board View are visible to the client in Freeform. If you want to hide any annotations, remove them in Board View before presenting.
Click "Preview" to open the client view in a new tab. Scroll to every part of the canvas to confirm nothing is clipped and the layout reads as intended.
Track every round of feedback
Each time you share, a revision is saved. Revision History stores every round permanently — approved, rejected, and pending counts at a glance, with client comments attached per product.
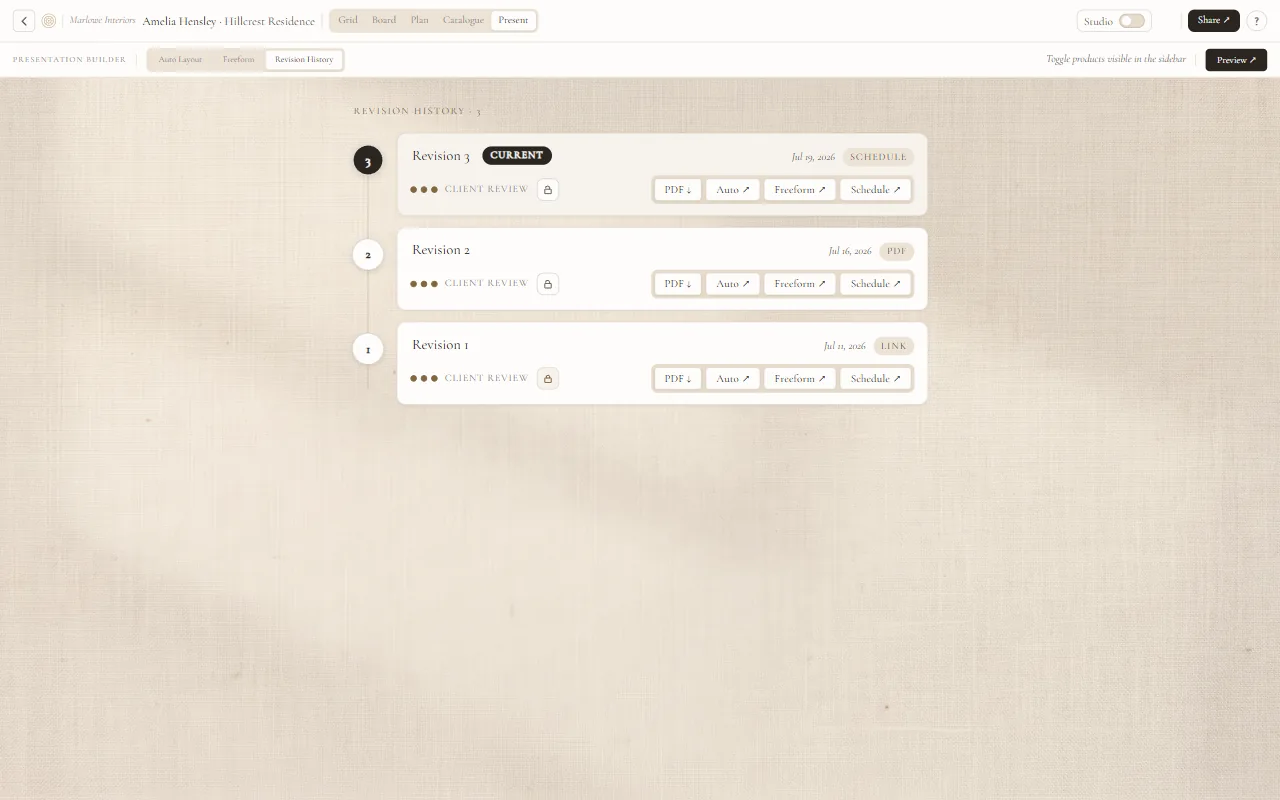
A new revision is saved automatically every time you export or share from the Export & Share dialog — clicking "Download PDF ↓", "Auto Layout ↗", "Freeform ↗", or "Technical Schedule ↗" each creates a new entry. Revisions are numbered automatically ("Revision 1", "Revision 2"). To rename one, click the revision name directly in Revision History.
Click the "Revision History" tab inside the Present panel. All saved revisions appear in reverse chronological order — newest first.
Each revision card shows four buttons: PDF ↓ downloads the presentation as a PDF. Auto ↗ opens the Auto Layout view in a new tab. Freeform ↗ opens the freeform canvas view. Schedule ↗ opens the product schedule. Use these to review exactly what the client received for that revision.
Each revision is a link you sent. Click "Remove link" to stop your client from opening it — the revision itself stays in your history, exactly as it was. To share it again, open it from PDF, Auto, Freeform or Schedule and a new link is created; the old one stays dead.
Click the lock icon on any revision to archive it. Locked revisions display a padlock badge and cannot be modified. Use this to mark an agreed-upon selection as final for the record.
Click the bin icon on a revision to delete it. You will be asked to confirm first: its link stops working for your client, it disappears from your history, and it cannot be undone. Photos that only that revision was keeping are freed from your storage. If you only want to stop your client from opening it, use "Remove link" instead.
See what your client sees
Preview opens the exact client view in a new tab — before you send anything. Review layout, product order, and visible items, and switch between Auto Layout and Freeform to decide which to share.
In the Present tab, choose your layout mode (Auto Layout or Freeform) and adjust visibility toggles to show the products you want. This is the state Preview will reflect.
The Preview button is in the top right corner of the Present tab. Click it — a new browser tab opens immediately showing the client view.
Scroll through the entire preview. Check product order, image quality, room sections, and all visible items. Look for anything that needs adjustment before sharing with the client.
Inside the preview tab, use the mode toggle to switch between Auto Layout and Freeform. Compare both without returning to the editor — decide which layout to send.
If you spot something to fix, close the preview tab and make changes in the Present or Grid tabs. Preview does not affect the live board — open it as many times as you need.
Control what appears in the presentation
Each product has an on/off toggle in Present View. Use it to build targeted presentations — show only one room, only approved items, or a curated selection for a specific meeting — without touching the live project.
Click "Present" in the top navigation bar. The "Spaces & Versions" sidebar appears on the left, listing all your spaces and their products with a dot indicator next to each one.
Click any product row to toggle its visibility. A filled gold dot means the product is visible in the presentation. An empty outlined dot means it is hidden. The product card disappears from the presentation immediately.
If a space has versions (Option A, Option B), each version has a pill switch on the left. Toggle the switch off to hide the entire version — all products in that version disappear at once. Toggle it back on to restore them.
Click to hide all products except one space to focus the presentation on a single room. This is useful for room-by-room client walkthroughs without creating separate projects.
Click any hidden product row again to make it visible. Changes to individual product visibility are saved — they persist between sessions until you toggle them back on.
Export, share, and collect feedback
The "Share ↗" button in the top right opens the Export & Share dialog. From there you control which product fields clients see, download a PDF, or open a share link. On Pro, each action also saves a revision to Revision History.
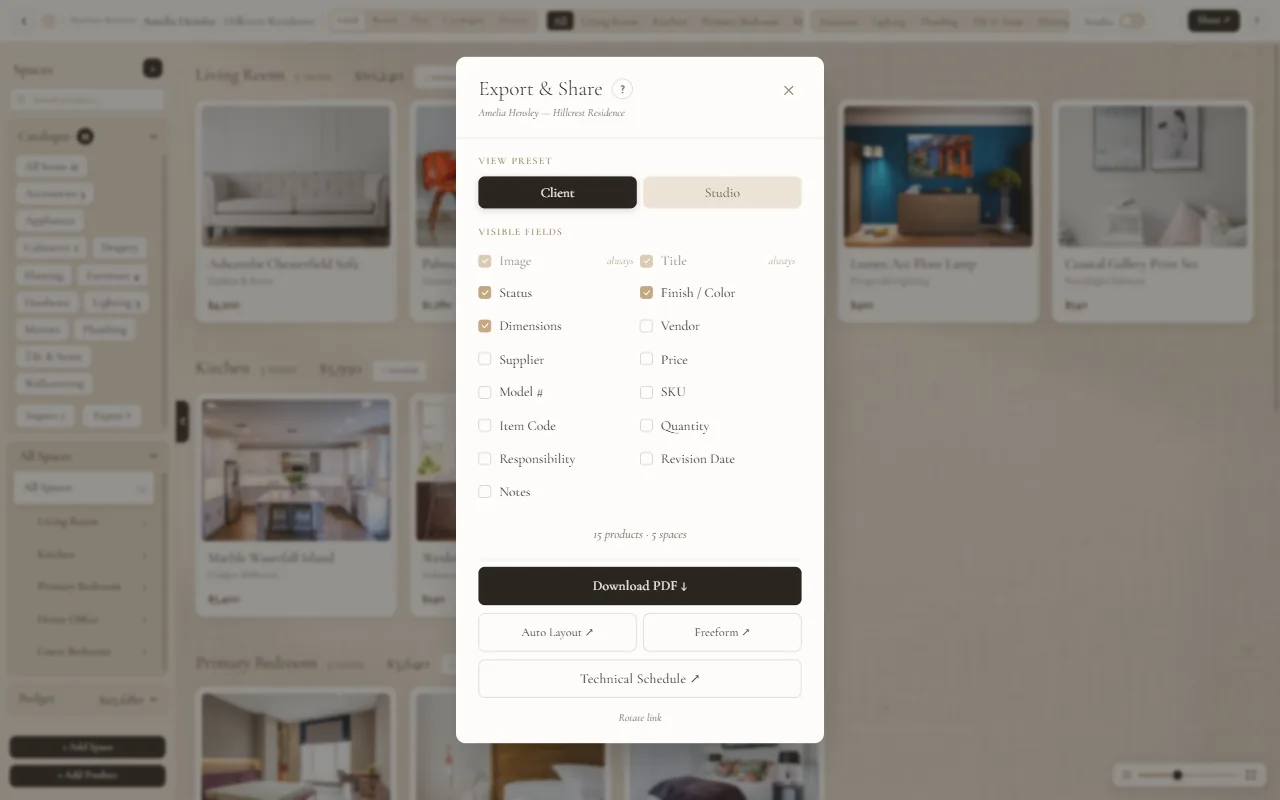
Click "Share ↗" in the top right corner of any project. The Export & Share dialog opens, showing the project name and the number of products and spaces that will be included.
Select a VIEW PRESET — "Client" loads a minimal set of fields (Status, Finish/Color, Dimensions); "Studio" loads all fields you have configured. Then use the checkboxes under VISIBLE FIELDS to fine-tune exactly which product specs appear on each card and in the PDF.
Click "Download PDF ↓" to export the board as a formatted PDF. Or click "Auto Layout ↗", "Freeform ↗", or "Technical Schedule ↗" to open that view in a new browser tab — copy the URL from the address bar and send it to your client.
On Pro, every time you click Download PDF or a share link, a new revision is added to Revision History with a badge showing what triggered it (PDF, LINK, or SCHEDULE). The revision is labeled "Revision N" by default — click the name in Revision History to rename it.
When clients open the share link, they see the product cards and can mark each one Approved (✓), Rejected (✗), or Pending (?), and leave a written comment. Their feedback is attached to that revision and visible in Revision History — it does not affect your live board.
Click "Rotate link" in the Export & Share dialog to invalidate all current share URLs and generate a new one. Use this if you want to revoke client access or reset after a wrong link was shared.
* If revisions do not appear immediately after sharing, refresh the browser — they sync in real time but may require a page reload.
Build your product library
The Studio Catalogue is your cross-project product library. Save any product once and reuse it across every project — no re-entering specs, no re-uploading images. Browse it full-screen from the Catalogue tab, or drag items straight onto a board from the Catalogue panel.
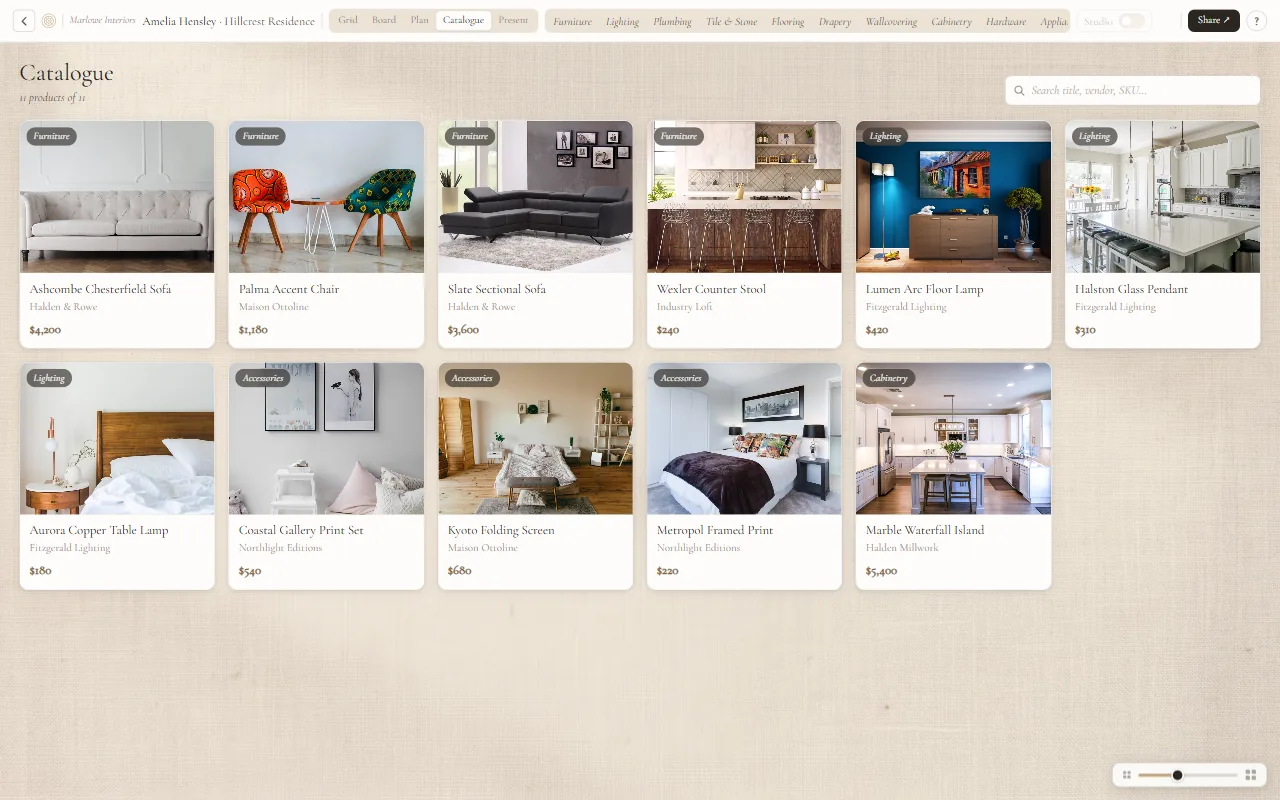
In Grid or Board View, right-click any product card and select "Add to Catalogue". The product is saved to your studio library with its image and all specs intact.
Click "Catalogue" in the top navigation bar. Your entire library opens full-screen. Filter by category from the top bar, search by title, vendor, or SKU, and use the size slider at the bottom right to browse tighter or larger.
Right-click a product (long-press on iPad) to open its menu:
The Catalogue panel in the left sidebar of Grid and Board View lists your items by category. Drag any item straight onto the canvas or into a space — supplier info, dimensions, price, and image already filled in.
In Grid View, click "Export ↑" in the left sidebar to download a ZIP with all your catalogue items and their images. Click "Import ↓" and select a ZIP to restore them — specs and images included. This also works across different accounts.
Manage your studio
Studio Settings controls how your firm appears on all exports and client-facing documents. Access it from the user menu in the top-right corner of the dashboard.
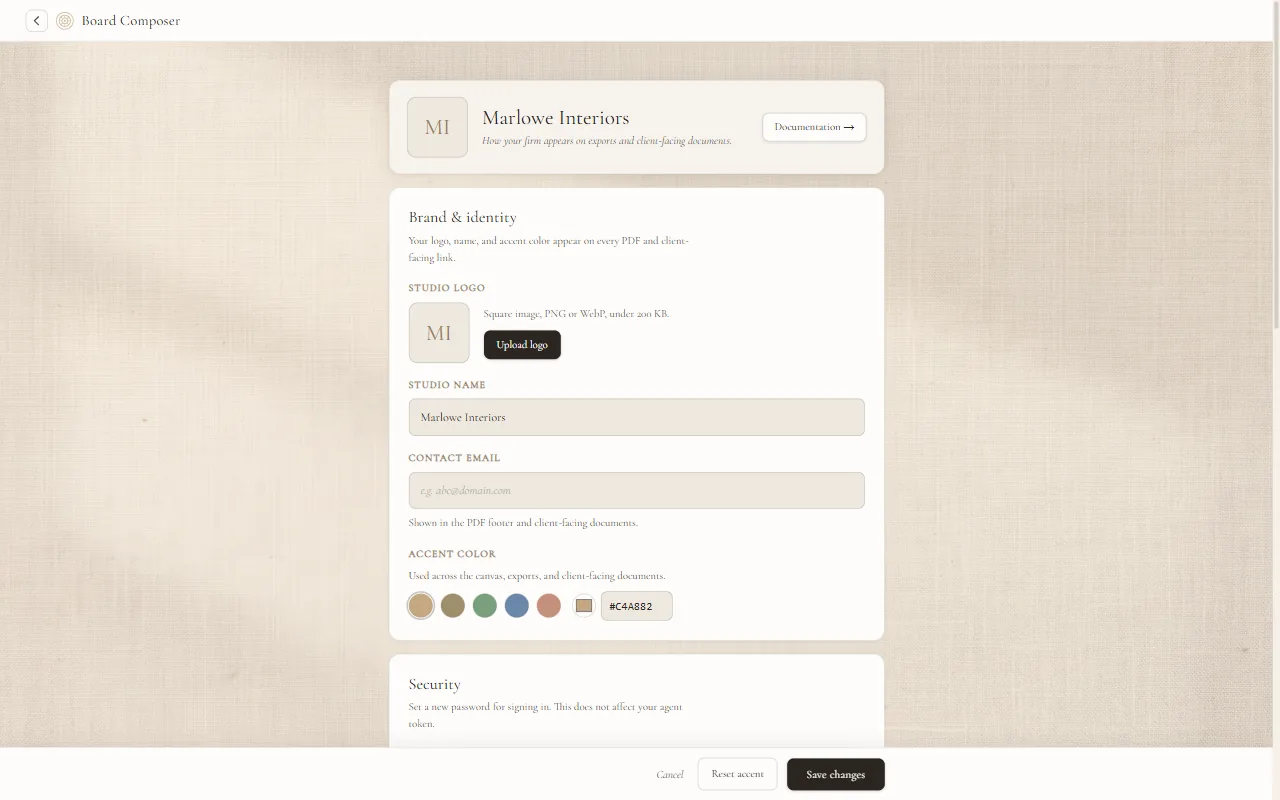
In Studio Settings, click the logo area and select a PNG or WebP file under 200KB. Your logo immediately replaces the Board Composer mark on all PDF exports and client share links. Recommended: square image.
Enter your studio name and the email you want shown in PDF footers and client-facing documents. Under Accent Color, choose one of the 5 preset swatches or type a custom hex code — this color is used across the canvas and all exported documents.
Scroll to Data Export and click "Export my data ↓". A JSON file downloads with all your projects, spaces, products, and catalogue items. Use this as a backup or for migration.
Scroll to the AI agent section to copy your setup prompt or your connection details. Click "Revoke token" to disconnect all AI clients immediately; a new token is generated automatically, which you use to reconnect. AI Agent Memory, in the same section, records how you like to work so the agent applies it next time.
How space and limits work
Every account has room for a generous amount of work, and Board Composer looks after it for you: images are compressed the moment you upload them, and a bar in Studio Settings shows how much room you have left at a glance. This section explains what you will see and what to do about it.
Open Studio Settings from the user menu in the top-right corner. The Storage bar covers everything you have uploaded: product photos, project covers, floor plans and catalogue images. While it reads "Plenty of space" there is nothing to do.
The bar is telling you to tidy up before it becomes urgent. Its colours show where the room is going. Deleting a finished project, removing catalogue items you no longer use, or deleting old revisions you no longer need (the History colour) frees the room those images were taking. There is no need to delete anything you still need — the bar is a heads-up, not a deadline.
Adding a great many images in one go can pause uploads briefly. Nothing is lost: wait a short while and try again, and the images you already added stay exactly where they were.
This one does not clear on its own — waiting will not help. Free up room by deleting projects or catalogue items you no longer need, and then upload again. Board Composer says which of the two it is, so you never have to guess.
Very large files, and files that are not really images, are turned away with an explanation of what to do instead. Exporting the file again at a lower resolution, or saving a floor plan as a PDF, is usually all it takes — plans keep their full detail either way.
Your catalogue holds a fixed number of items on each plan, and Studio Settings shows the counter. Remove items you no longer use to make room for new ones. Deleting a catalogue item never affects the projects that already use it.
Let AI work for you
Connect the AI agent you already use to your workspace. It can create projects, add products, fill in specs, download product images from a URL, and prepare client presentations. You describe the outcome, and the agent does the work.
Open Studio Settings (click your name or avatar in the top-right corner) and scroll to the "AI agent" section. Your connection token is already there. Use "Copy connection details" to get the server URL and token that any MCP client needs. If you happen to use Claude Desktop, there is also a one-click "Copy setup prompt" that configures it for you.
Use whichever AI client you prefer; any one that supports MCP can connect to Board Composer. There is no required client. A paid plan is needed on the client you choose.
How you connect depends on your client:
How to check depends on your client:
Open a new chat and describe what you need. Your AI agent now has full access to your Board Composer workspace: it can create projects, add rooms, fill in product specs, download product images from any URL, and generate client share links. You just describe the outcome you want.